Compare commits
No commits in common. "main" and "master" have entirely different histories.
@ -1,79 +0,0 @@
|
||||
---
|
||||
title: Build a Keyboard Links
|
||||
tags:
|
||||
- keyboard
|
||||
categories:
|
||||
- builds
|
||||
date: 2023-01-11 19:48:00
|
||||
---
|
||||
|
||||
Trying to build your own keyboard? Here are some links!
|
||||
|
||||
## Keyboard builds
|
||||
|
||||
List of open source, ergonomic keyboards
|
||||
https://github.com/Ultrahalf/ergo-keeb
|
||||
|
||||
Keyboard builders digest - Great site for news and inspiration
|
||||
https://kbd.news/
|
||||
|
||||
## Shopping for parts
|
||||
|
||||
Little Keyboards - Low Cost boards with kits and low cost cases.
|
||||
https://www.littlekeyboards.com/
|
||||
|
||||
Kriscable - In Europe but also has cool cables
|
||||
https://kriscables.com/
|
||||
|
||||
Keebio - A little more expensive but offers pre-soldered boards for easier entry
|
||||
https://keeb.io/
|
||||
|
||||
Insane ergo keyboards
|
||||
https://bastardkb.com/
|
||||
|
||||
https://shop.beekeeb.com/
|
||||
|
||||
https://novelkeys.com/
|
||||
|
||||
https://mysticmechs.com/
|
||||
|
||||
https://boardsource.xyz/
|
||||
|
||||
Affordable Switches
|
||||
https://divinikey.com/collections/switches
|
||||
https://bolsakeyboardsupply.com/collections/all
|
||||
https://en.akkogear.com/store/switch/
|
||||
https://www.kailh.net/
|
||||
|
||||
##### High Quality key Caps
|
||||
|
||||
KBDFANS - https://kbdfans.com/collections/keycaps?filter.v.availability=1&filter.v.price.gte=&filter.v.price.lte=52&sort_by=created-descending
|
||||
Keebmonkey - https://www.keebmonkey.com/collections/keycaps
|
||||
KPREPUBLIC - https://kprepublic.com/collections/keycaps
|
||||
|
||||
## Firmware and setup
|
||||
|
||||
QMK Configurator - Firmware modification and compilation in your browser
|
||||
https://config.qmk.fm/#/lily58/rev1/LAYOUT
|
||||
|
||||
Via - Keyboard Configuration in browser
|
||||
https://usevia.app/#/
|
||||
|
||||
## My Builds
|
||||
|
||||
[Lily58 Pro](https://www.littlekeyboards.com/collections/lily58-pcb-kits/products/lily58-pro-pcb-kit)
|
||||
|
||||
|
||||
[Quefrency Rev. 3](https://keeb.io/collections/quefrency-split-staggered-65-keyboard/products/quefrency-60-65-split-staggered-keyboard-1)
|
||||
|
||||
|
||||
Spare parts numpad.
|
||||
|
||||
|
||||
Quefrency with green LEDs and spare keycaps
|
||||

|
||||
|
||||
Another Quefrency! This one is for a friends birthday. Fun cat keycaps. The tape is to explain what the cat keys are before first use.
|
||||
|
||||
|
||||
Why am I building keyboards like this? -> https://www.youtube.com/watch?v=76eALNFp3kk
|
||||
@ -1,17 +0,0 @@
|
||||
---
|
||||
title: Catch missing image assets inside image tag
|
||||
tags: []
|
||||
categories:
|
||||
- Web Dev
|
||||
date: 2023-01-01 05:30:01
|
||||
---
|
||||
|
||||
If an image is being displayed on a website and for some reason that asset disappears, you can catch that error and display a placeholder image with a little inline js.
|
||||
|
||||
Here is an example:
|
||||
|
||||
<img src="/marketing/importantImage.png"
|
||||
onerror=" this.onerror = null; this.src='/marketing/backupimage.png';"
|
||||
/>
|
||||
|
||||
This will help prevent image 404's on the site if someone decides to go and delete a bunch of images. Since is just a little js snippet, you can change the class, report the error or even remove the element entirely.
|
||||
@ -1,27 +0,0 @@
|
||||
---
|
||||
title: Change remote origin in git repo
|
||||
author: Max Gialanella
|
||||
date: 2023-03-02 01:58:28
|
||||
tags:
|
||||
---
|
||||
|
||||
Sometimes you need to change the remote origin in a git repo, if the server moves or if you just get better at NGINX and change the URL to something cleaner. Here are the simple steps on how to update your remote origin.
|
||||
|
||||
##### List remote origins
|
||||
|
||||
`git remote -v`
|
||||
|
||||
##### Add new remote origin
|
||||
|
||||
`git remote set-url add origin https://sweetNewDomain/git/user/RepoName`
|
||||
|
||||
##### Remove old origin
|
||||
|
||||
`git remote set-url delete origin 192.168.1.33:3030/git/user/RepoName`
|
||||
|
||||
##### List remote origins again
|
||||
|
||||
`git remote -v`
|
||||
|
||||
Verify that your URLs are correct and do a `git fetch` make sure everything is working. On your next push, you will need to re-enter your username and password.
|
||||
Nice work!
|
||||
@ -1,24 +0,0 @@
|
||||
---
|
||||
title: Killing programs in mac or linux
|
||||
tags:
|
||||
- linux
|
||||
- bash
|
||||
categories: []
|
||||
date: 2023-01-01 05:30:35
|
||||
---
|
||||
|
||||
To kill all instances of an application us the command **killall**
|
||||
|
||||
It can be tedious to find all the processes you are trying to kill based on process id. There is a cool little command that can do the work for you, killall.
|
||||
|
||||
You can kill all instances of a misbehaving program:
|
||||
|
||||
> $sudo killall discord
|
||||
|
||||
Or you can kill using wild cards:
|
||||
|
||||
> $sudo killall node\*
|
||||
|
||||
If you want to check what you will kill you can use the command:
|
||||
|
||||
> $ps aux | grep node\*
|
||||
@ -1,14 +0,0 @@
|
||||
---
|
||||
title: Linux Search text in this and all sub directories
|
||||
author: Max Gialanella
|
||||
tags:
|
||||
- linux
|
||||
- bash
|
||||
categories: []
|
||||
date: 2023-01-11 21:43:00
|
||||
---
|
||||
|
||||
Search text files in current directory and all sub directories. Its super fast so don't worry if you have a node_modules directory or something.
|
||||
|
||||
Use this command:
|
||||
`grep -rnw '.' -e 'search text'`
|
||||
@ -1,15 +0,0 @@
|
||||
---
|
||||
title: Lower Pipewire CPU usage on Ubuntu while using Firefox
|
||||
author: Max Gialanella
|
||||
date: 2023-06-14 16:50:45
|
||||
tags:
|
||||
---
|
||||
|
||||
I was noticing high CPU usage for the pipewire process on Ubunutu.
|
||||
|
||||
After some digging, I came across [this thread](https://gitlab.freedesktop.org/pipewire/pipewire/-/issues/1968). The culprit is an accessibility feature in Firefox. If you are not using firefox's speech synthases features you can disable it to drop CPU usage.
|
||||
|
||||
1. Type `about:config` into the Address bar.
|
||||
1. Search `media.webspeech.synth.enabled`
|
||||
1. Set `media.webspeech.synth.enabled` to false.
|
||||
1. Restart Firefox and check pipwire process cpu usage
|
||||
@ -1,14 +0,0 @@
|
||||
---
|
||||
title: Neovim
|
||||
author: Max Gialanella
|
||||
tags:
|
||||
- vim
|
||||
categories:
|
||||
- linux
|
||||
date: 2023-01-01 16:57:00
|
||||
---
|
||||
|
||||
Why would anyone in their right mind us vim? I asked myself this question 543 times in the last 3 years. To my own surprise, I found myself wanting to use vim. The justification being that you can write code without using a mouse.
|
||||
|
||||
Jumpstart Neovim
|
||||
https://github.com/ur4ltz/kickstart.nvim
|
||||
@ -1,36 +0,0 @@
|
||||
---
|
||||
title: Sunshine a Parsec Alternative for Linux, GeForce Now alternative for Windows
|
||||
tags: []
|
||||
categories: []
|
||||
date: 2023-01-01 05:31:17
|
||||
---
|
||||
|
||||
Sunshine is a desktop streaming client for linux that offers efficient, low latency PC streaming, for free.
|
||||
Download Sunshine onto your linux machine (the host)
|
||||
[Sunshine Github][1]
|
||||
Download moonlight onto whatever device you streaming on (the client)
|
||||
[Moonlight Homepage][2]
|
||||
|
||||
I have spent a considerable amount of time looking for something that would replace Parsec when I switched to linux. A number of posts spoke about NoMachine, TightVNC and a number of other VNC clients. None of them were sufficient for what I wanted; low latency, high refresh rate, unlimited access to my PC.
|
||||
|
||||
Sunshine checks all the boxes. It uses an implementation of Nvidia's GameStream service. Its really fast and reliable. Better yet, you don't need to install Nvidia's crappy GeForce experience if you are doing this on a windows machine, you can also use Sunshine.
|
||||
|
||||
If you want to use sunshine outside of your local network, turn on Upnp in your router so that sunshine can set up all the required ports.
|
||||
|
||||
Checkout the sunshine docs for installation instructions -> https://docs.lizardbyte.dev/projects/sunshine/en/latest/about/installation.html
|
||||
|
||||
Start Running
|
||||
cd downloads
|
||||
./sunshine.AppImage --install && ./sunshine.AppImage
|
||||
|
||||
Once its set up, you can configure options in a browser. Visit:
|
||||
https://localhost:47990/
|
||||
|
||||
[1]: https://github.com/LizardByte/Sunshine
|
||||
[2]: https://moonlight-stream.org/
|
||||
|
||||
Additional fun stuff:
|
||||
Moodlight supports wake on lan WOL. This is a feature on motherboards that allows the computer to boot up or wake from sleep.
|
||||
Go into your bios and make sure its turned on. You can tell your eithernet controller is running during sleep if you sleep your computer but you can still see the orange light blinking on your eithernet port.
|
||||
If you setup moonlight to work outside your network, you can also setup Wake on Lan, to wake up your computer if you are out of the house.
|
||||
Port Forward UDP 7-9 to the Sunshine host. Now you can wake your computer from anywhere in the world.
|
||||
@ -1,41 +0,0 @@
|
||||
---
|
||||
title: "Proudest Software Engineering Achievements"
|
||||
description: "A few highlights of my time programming"
|
||||
date: "2023-12-1"
|
||||
---
|
||||
|
||||
### Mitigating hype-driven-development as a team lead. Building a cohesive tech stack and uniform product
|
||||
|
||||
Migrating from an old, unsupported technology to a new, feature rich technology is often the crux of a companies future proofing strategy. Being left on an aging platform could hobble future growth and slow development.
|
||||
|
||||
When I was team lead at Article One Partners, this was the first thing I wanted to tackle. How do we migrate an antiquated, fragmented system, to a more cohesive stack? A previous dev, convinced the manager to adopt new technologies as they became popular. This left us with a LAMP stack, running Smarty (an old PHP frontend) jQuery UI, Angular, React and Vue, with two weird support microservices written in Node.js and a nightmare webpack config. All this was built on top of an old Zend 2 backend with a partially implemented ORM on an aging version of PHP.
|
||||
|
||||
We needed a clever strategy to mitigate tech debt, remove unused technologies, update to new technologies, support old features that could not be updated, all while allowing for development of new features.
|
||||
|
||||
The first order of business was to plan a path forward with the technologies that were giving us the greatest benefit. For the front end it was Vue, with a custom webpack config. Which required the phasing out of the React, Angular and jQuery. For the backend we planned a migration path, removing all handwritten MySQL and MySQL stored procedures, migrating to the latest version of Doctrine ORM and then migrating the entire stack from PHP 5 to PHP 7.
|
||||
|
||||
The first step was to build a uniform data layer between the backend and the frontend, this allowed all technologies to exist at the same time using the same data. Pieces of the frontend and backend could then be replaced piecemeal without disrupting the current application.
|
||||
|
||||
We continued:
|
||||
|
||||
- Isolating Features per page with a uniform data delivery for entire site.
|
||||
- Removing dependencies on old pages that used Smarty, Angular & React.
|
||||
- Building Interoperable components for legacy pages and vue pages.
|
||||
- Replacing dated pages, as time allowed, with single page applications.
|
||||
|
||||
As time went on, the efforts and planning paid off. The entire application was using a uniform frontend and styles framework. Each page was an isolated single page application which could be maintained and updated easily. The backed was secure and much faster thanks to PHP 7. The whole stack was maintainable. Dependencies and packages were at their latest versions.
|
||||
|
||||
This is one of my proudest achievements because of the scale and foresight put into the project was a massive success. The tech stack became much more secure, faster and
|
||||
maintainable, new features could be developed and uniform technologies across the platform allowed for very fancy new projects to be built and implemented with minimal hassle.
|
||||
|
||||
(More in progress)
|
||||
|
||||
### building a performant browser based pdf annotator
|
||||
|
||||
### integration of socket.io backend and vue event-bus for solid scribe
|
||||
|
||||
### analytical engine for finding study submission duplicates
|
||||
|
||||
### dynamic programming for satisfaction criteria in submissions highlights
|
||||
|
||||
### cross implementation of smarty and vue for migration
|
||||
@ -1,24 +0,0 @@
|
||||
---
|
||||
title: Run bash script on linux start
|
||||
author: Max Gialanella
|
||||
tags:
|
||||
- bash
|
||||
- linux
|
||||
categories: []
|
||||
date: 2023-09-10 18:26:00
|
||||
---
|
||||
|
||||
Running a bash script on system start can be an involved process, depending on you distro. The proper way is to create a system service and plug it into /init.d but you can leverage the crontab if you want a simple quick way to run something on startup.
|
||||
|
||||
How to run a script on start up/reboot
|
||||
Create Script
|
||||
`cd` return to user home
|
||||
`vim startup.sh` create script
|
||||
`chmod +x startup.sh` Make script executable
|
||||
`crontab -e` Edit crontab
|
||||
|
||||
Add the line
|
||||
`@reboot sh $HOME/startup.sh`
|
||||
|
||||
Now your script will run on reboot.
|
||||
[Source Stack overflow thread](https://stackoverflow.com/a/29247942)
|
||||
@ -1,145 +0,0 @@
|
||||
---
|
||||
title: Sending Emails with Cloudflare Workers
|
||||
author: Max Gialanella
|
||||
tags: []
|
||||
categories: []
|
||||
date: 2023-10-01 20:12:00
|
||||
---
|
||||
|
||||
Cloudflare has a partnership with MailChannels which has allowed Cloudflare to introduce email sending into its web workers. There is some documentation to set this up but its all over the place. Here are the steps I took to get email sending running, using workers.
|
||||
|
||||
Before getting started you want to generate public and private keys for your DKIM records.
|
||||
I grabbed steps from this guide -> https://github.com/cloudsecurityalliance/webfinger.io/blob/main/docs.webfinger.io/DKIM-setup.md
|
||||
|
||||
###### Generate a DKIM private and public key:
|
||||
|
||||
Private key as PEM file and base64 encoded txt file:
|
||||
|
||||
```
|
||||
openssl genrsa 2048 | tee priv_key.pem | openssl rsa -outform der | openssl base64 -A > priv_key.txt
|
||||
```
|
||||
|
||||
Public key as DNS record:
|
||||
|
||||
```
|
||||
echo -n "v=DKIM1;p=" > pub_key_record.txt && \
|
||||
openssl rsa -in priv_key.pem -pubout -outform der | openssl base64 -A >> pub_key_record.txt
|
||||
```
|
||||
|
||||
###### Setup DNS records:
|
||||
|
||||
SPF record:
|
||||
`TXT`, `YOUR DOMAIN.COM`, `v=spf1 ~all`
|
||||
|
||||
DMARC record:
|
||||
`TYT`,
|
||||
`_dmark`,
|
||||
`v=DMARC1; p=none;rua=mailto:741da103196f4adba4f119840d7b8919@dmarc-reports.cloudflare.net`
|
||||
|
||||
Mail Channels Record:
|
||||
|
||||
> Important note, this is the domain of your worer sending emails. Its probably something like "dev.yourdomain.com" check your worker setup.
|
||||
> `TXT`,`_mailchannels`,`v=mc1 cfid=YOUR DOMAIN.COM`
|
||||
|
||||
Mailchannels Domain Key Record:
|
||||
`TXT`,`mailchannels._domainkey`,`CONTENTS OF pub_key_record.txt`
|
||||
|
||||
###### Setup a new worker for sending emails
|
||||
|
||||
Go into cloudflare and setup a new worker.js and paste in the following code.
|
||||
|
||||
```
|
||||
addEventListener("fetch", event => {
|
||||
event.respondWith(handleRequest(event.request))
|
||||
})
|
||||
|
||||
async function handleRequest(request) {
|
||||
|
||||
let respContent = "";
|
||||
|
||||
// only send the mail on "POST", to avoid spiders, etc.
|
||||
if( request.method == "POST" ) {
|
||||
|
||||
const formData = await request.formData();
|
||||
const body = {};
|
||||
for (const entry of formData.entries()) {
|
||||
body[entry[0]] = entry[1];
|
||||
}
|
||||
fls = JSON.parse(JSON.stringify(body));
|
||||
|
||||
let send_request = new Request("https://api.mailchannels.net/tx/v1/send", {
|
||||
"method": "POST",
|
||||
"headers": {
|
||||
"content-type": "application/json",
|
||||
},
|
||||
"body": JSON.stringify({
|
||||
"personalizations": [
|
||||
{ "to": [ {"email": "RECIPIENT@EMAIL.COM",
|
||||
"name": 'Email Tester'}],
|
||||
"dkim_domain": 'YOURDOMAIN.com',
|
||||
"dkim_selector": 'mailchannels',
|
||||
"dkim_private_key": `<${PrivateKey}>`,
|
||||
|
||||
}
|
||||
],
|
||||
"from": {
|
||||
"email": "admin@ravenwulfconsulting.com",
|
||||
"name": "admin",
|
||||
},
|
||||
"reply_to": {
|
||||
"email": `${body.email}`,
|
||||
"name": `${body.name || 'No Name Provided'}`,
|
||||
},
|
||||
"subject": `${body.subject || 'No Subject'}`,
|
||||
"content": [{
|
||||
"type": "text/plain",
|
||||
"value":
|
||||
`Email: ${body.email}
|
||||
Name: ${body.name || 'No Name Provided'}
|
||||
|
||||
${body.message || 'No Message'}
|
||||
`,
|
||||
}],
|
||||
}),
|
||||
});
|
||||
|
||||
const resp = await fetch(send_request);
|
||||
respContent = resp.status + " " + resp.statusText
|
||||
}
|
||||
|
||||
let htmlContent = "<html><head></head><body><pre>" +
|
||||
`
|
||||
<form method="post">
|
||||
Sub: <input type="text" name="subject" value="Testing email sending" /><br>
|
||||
Name: <input type="text" name="name" value="Testman Testerguy" /><br>
|
||||
Email: <input type="text" name="email" value="testformsubmit@gmail.com" /><br>
|
||||
Msg: <input type="text" name="message" value="This is a test email to test the email send worker" /><br>
|
||||
<input type="submit" value="Send"/>
|
||||
</form>
|
||||
` +
|
||||
"<pre>" + respContent + "</pre>" +
|
||||
"</body></html>";
|
||||
return new Response(htmlContent, {
|
||||
headers: { "content-type": "text/html" },
|
||||
})
|
||||
}
|
||||
```
|
||||
|
||||
This code is crap and extremely insecure. Its a combination of code from various sources. Its super crappy. Its just a simple foundation to get your own worker set up.
|
||||
|
||||
Pay close attention to the status messages after posting the form.
|
||||
|
||||
- 200 - Success
|
||||
- 400 - DNS records are not set up properly, or didn't propagate. Mailchannels is rejecting request.
|
||||
- 500 - Post data isn't correct. You won't get any error messages, just a 500
|
||||
|
||||
Best of luck getting everything running.
|
||||
|
||||
Sources:
|
||||
|
||||
- Seting up DKIM Records: https://github.com/cloudsecurityalliance/webfinger.io/blob/main/docs.webfinger.io/DKIM-setup.md
|
||||
- Cloudflare DKIM Explnained: https://www.cloudflare.com/en-ca/learning/dns/dns-records/dns-dkim-record/
|
||||
- Mailchannels Adding DKIM to workers: https://support.mailchannels.com/hc/en-us/articles/7122849237389-Adding-a-DKIM-Signature
|
||||
- Email Worker Code: https://gist.github.com/IhsanGan/6111b59b9a7b022b5897d28d8454ad8d
|
||||
- Email Worker Post: https://support.mailchannels.com/hc/en-us/articles/4565898358413-Sending-Email-from-Cloudflare-Workers-using-MailChannels-Send-API
|
||||
- Tons of snippets from this thread: https://community.cloudflare.com/t/send-email-from-workers-using-mailchannels-for-free/361973
|
||||
@ -1,28 +0,0 @@
|
||||
---
|
||||
title: Setup nginx to point subdomain at port
|
||||
author: Max
|
||||
tags:
|
||||
- home server
|
||||
categories:
|
||||
- computers
|
||||
date: 2023-01-01 04:39:00
|
||||
---
|
||||
|
||||
You can setup nginx to point subdomains at specific ports.
|
||||
|
||||
Set up your a records
|
||||
|
||||
set up nginx
|
||||
|
||||
```
|
||||
server {
|
||||
server_name blog.maxg.cc www.blog.maxg.cc;
|
||||
listen 80;
|
||||
root /data/blog/folder;
|
||||
index index.html;
|
||||
}
|
||||
```
|
||||
|
||||

|
||||
|
||||
OK THEN
|
||||
@ -1,15 +0,0 @@
|
||||
---
|
||||
title: Sleep Linux Mint Keyboard Shortcut
|
||||
tags:
|
||||
- linux
|
||||
categories: []
|
||||
date: 2023-01-14 18:18:45
|
||||
---
|
||||
|
||||
Sleep Linux Mint with this keyboard shortcut
|
||||
|
||||
`CTRL + ALT + END`
|
||||
|
||||
This shortcut was oddly challenging to find.
|
||||
I hope others enjoy using it as much as I do.
|
||||
Goodnight
|
||||
@ -1,32 +0,0 @@
|
||||
---
|
||||
title: Get .env file variables into bash scripts
|
||||
tags:
|
||||
- bash
|
||||
categories: []
|
||||
author: Max
|
||||
date: 2023-01-01 04:07:00
|
||||
---
|
||||
|
||||
If your server has a .env file, it may be necessary to parse those variables into a bash script. This can be accomplished by using the 'source' command.
|
||||
|
||||
A .env file is an important part of any application set up because it allows you to separate credentials of the app into different environments and pulls them out of the git repository.
|
||||
|
||||
Contents of a .env file may look like this:
|
||||
DB_USERNAME=root
|
||||
DB_PASSWORD=S0S3CUR3!
|
||||
|
||||
## How to pull .env variables into a bash script:
|
||||
|
||||
Make sure to start with the right [shebang][1] at the top of your file.
|
||||
|
||||
> #!/bin/bash
|
||||
|
||||
Pull in .env variables
|
||||
|
||||
> source ~/.env
|
||||
|
||||
Then reference those variables in your script
|
||||
|
||||
> echo "$DB_USERNAME"
|
||||
|
||||
[1]: https://earthly.dev/blog/understanding-bash/
|
||||
@ -1,17 +0,0 @@
|
||||
---
|
||||
title: Windows Hello for Linux
|
||||
tags: []
|
||||
categories: []
|
||||
date: 2023-01-01
|
||||
---
|
||||
|
||||
There is a program called Howdy, which is like Windows Hello. It uses face data as authentication.
|
||||
[Howdy Github Repository][1]
|
||||
|
||||

|
||||
|
||||
If you own a Logitech Brio or other camera with Windows Hello compatibility, Howdy will work perfectly.
|
||||
Howdy is better than windows hello though. It has a serious advantage while you are running it in linux; any time you would need to type in your password, howdy will verify with your camera. You won't have to type your password in for any authentication on your linux machine even on command line!
|
||||
|
||||
[1]: https://github.com/boltgolt/howdy
|
||||
[2]: /usr/uploads/2023/01/92500213.png
|
||||
@ -1,19 +0,0 @@
|
||||
---
|
||||
title: Tell Android to ignore folder contents
|
||||
tags:
|
||||
- android
|
||||
date: 2023-01-14
|
||||
---
|
||||
|
||||
Tired of showing the contents of your audio books library in your music app?
|
||||
|
||||
Many Android applications scan local directories and display the contents when you are trying to say, add an image to a text message.
|
||||
|
||||
> a `.nomedia` file tells android to ignore folder contents when doing automatic scans for a file type.
|
||||
|
||||
Using an app like Solid Explorer, browse into the folder you want to exclude, create a new file and call it `.nomedia`. Thats it, you are done.
|
||||
|
||||
For example, if you have an "audio-books" folder, you don't want that appearing in your music app.
|
||||
If you have a "spicy memes" folder, you don't want that appearing in your photos app.
|
||||
|
||||
Android has a built in mechanism that tells the system "Hey, ignore the contents of this folder." Simply browse into the folder (On your phone) and create an empty file, name that file `.nomedia`. Thats it! Android will now ignore that folder.
|
||||
@ -1,18 +1,14 @@
|
||||
---
|
||||
title: "Atreyu keyboard Build"
|
||||
description: "Creating a working ergonomic keyboard. From files to physical."
|
||||
description: "Creating a working ergonomic keyboard from files on git."
|
||||
date: "2023-10-1"
|
||||
---
|
||||
|
||||
{.banner2}
|
||||
|
||||
### It started with an existing keyboard
|
||||
|
||||
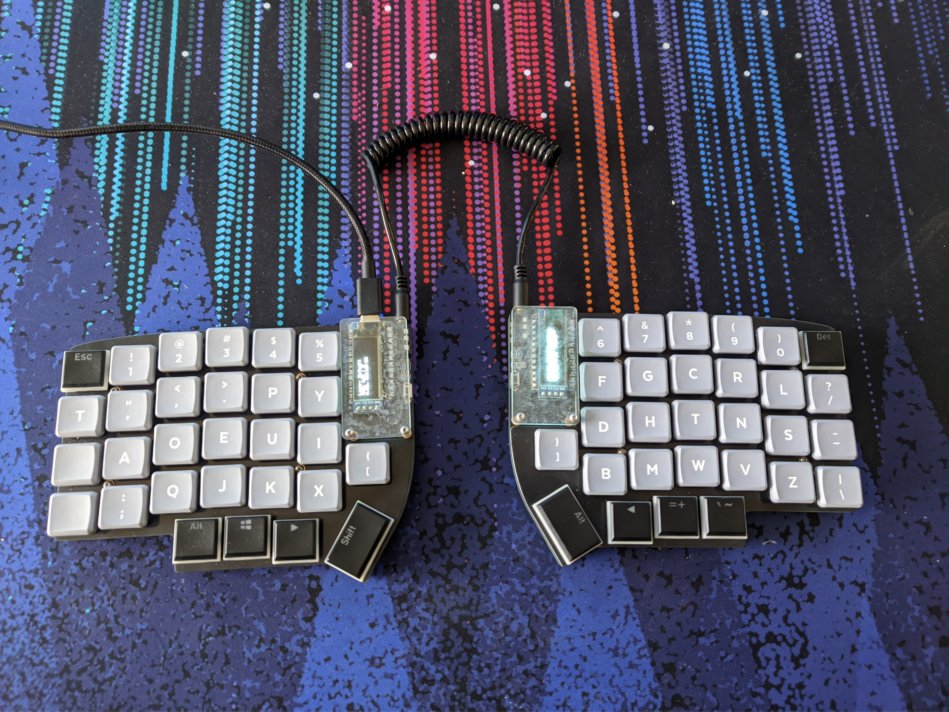
It all began with the [lily58](https://www.littlekeyboards.com/collections/lily58-pcb-kits/products/lily58-pro-pcb-kit). An ergonomic keyboard that has 58 keys. I loved the design and layout. But it wasn't portable. It required a large amount of desk space to function comfortably with palm wrests and wires running everywhere to connect the two halves of the board and the board to the computer.
|
||||
It all began with the [lily58](https://www.littlekeyboards.com/collections/lily58-pcb-kits/products/lily58-pro-pcb-kit). An ergonomic keyboard that has 58 keys. I loved the design and layout. But it wasn't portable. It required a large amount of desk space to function comfortably.
|
||||
|
||||
I began to browse around for other options. A portable, wireless, lily58 keyboard. Did such a thing even exist?
|
||||
|
||||

|
||||
I began to browse around for other options. A portable, wireless, lily58 keyboard.
|
||||
|
||||
### Finding the right project
|
||||
|
||||
@ -20,38 +16,20 @@ I found [this post](https://kbd.news/Atreyu-Rev2-MX-1911.html). Which lead me to
|
||||
|
||||
**There are none!**
|
||||
|
||||
You need to fabricate and assemble this keyboard from the files on github.
|
||||
You need to fabricate and assemble this keyboard from the files on github
|
||||
|
||||
### Exporting the cutter files and fabrication
|
||||
|
||||
Using [KiCad](https://www.kicad.org/) (An open source cad program for linux) I opened, customized and finally, after much reading and tweaking, exported the cutter files. Cutter files are used by PCB manufacturers to produce PCBs. I uploaded the files to Elecrow, a manufacturer in China. Then waited patiently for the PCBs to arrive in the mail.
|
||||
Using program I exported the cutter files
|
||||
|
||||
### Building and programming
|
||||
|
||||
Once the PCBs showed up, I began soldering. In short order everything was built and ready to go. Except the firmware. There were example firmwares in the source repository but I wanted some specific layers, macros and the Dvorak layout. To get all these features I had to build them using the ZMK firmware.
|
||||
After receiving the PCBs in the mail, I began soldering.
|
||||
|
||||
Understanding the ZMK firmware was a challenge. The way you program the keyboard is by building out header files in c. The documentation is decent but understanding what its doing and how its happening is challenging. One easy part of the project is the brilliant usage of Github Actions by the ZMK developers. Every time a commit is made and pushed to github, it builds the firmware for you automatically. This saves a lot of hassle and makes building keyboard firmware a lot more accessible.
|
||||
Understanding the ZMK firmware was a challenge. The way you program the keyboard is by building out header files in c. The documentation is decent but understanding what its doing and how its happening is challenging.
|
||||
|
||||
[After much trial and error](https://github.com/stimularity/zmk-config/commits/main) the keyboard was ready for action.
|
||||
|
||||

|
||||
Example of zmk header for Dvorak layout
|
||||
After much trial and error the keyboard was ready for action.
|
||||
|
||||
### Blank Keycaps
|
||||
|
||||
At first the blank keycaps were a cost saving measure. Keycaps without legends are considerably cheaper. But after some time using them, I have come to love them. Despite being able to touch type people generally still look at the keys frequently for numbers and symbols. Without any reference, you learn to touch type them as well. Ultimately it has made me a faster typist.
|
||||
|
||||
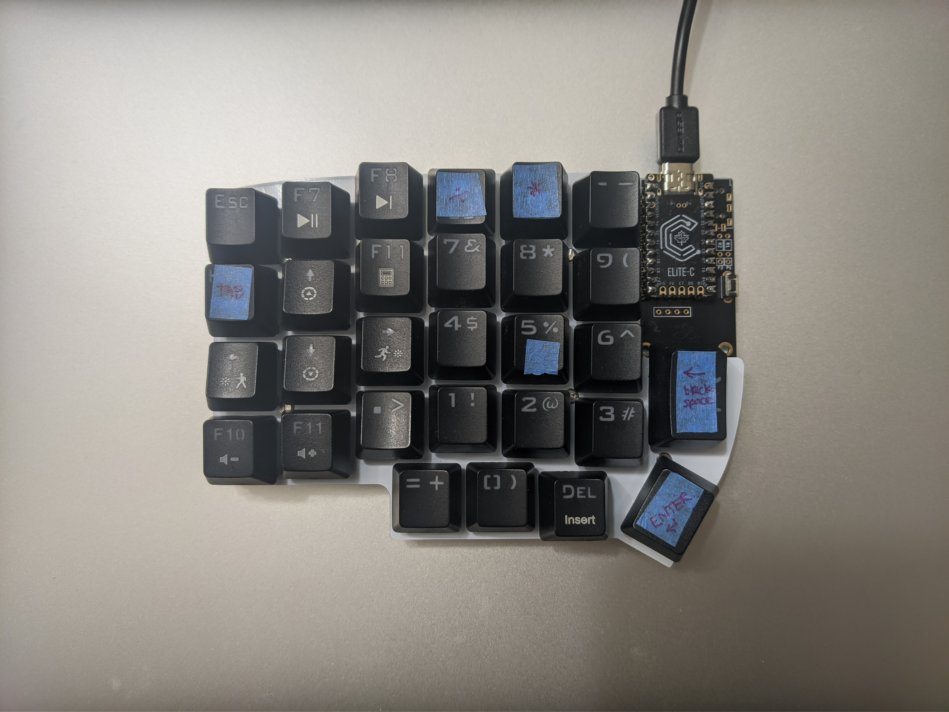
# My first build with the Atreyu PCB
|
||||
|
||||
Used a large battery which I drew a mutant frog on the tape.
|
||||

|
||||
|
||||
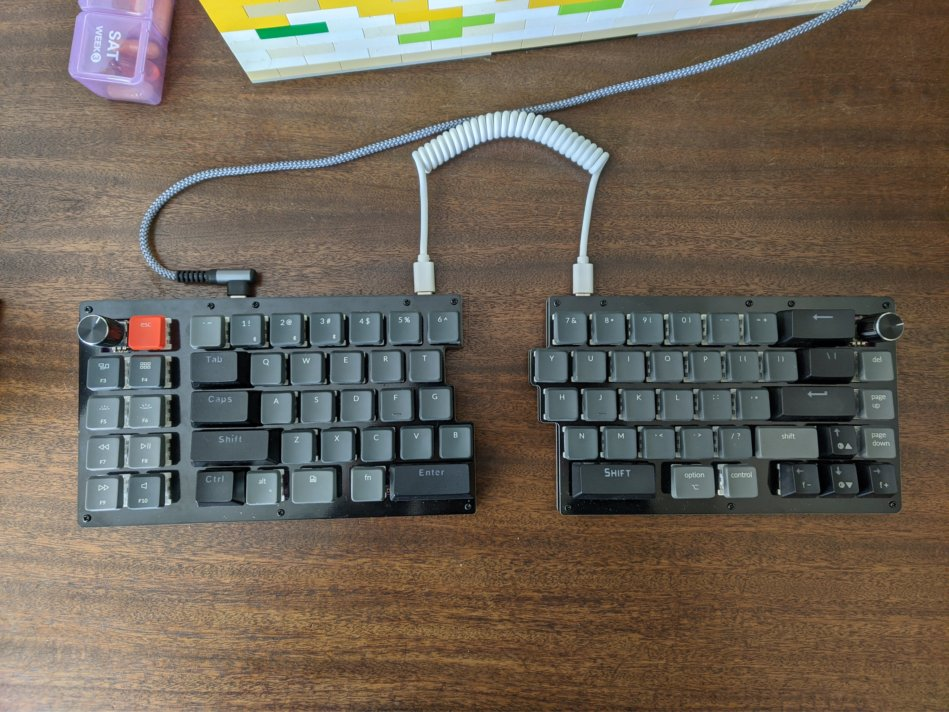
# First build and second build
|
||||
|
||||

|
||||

|
||||
|
||||
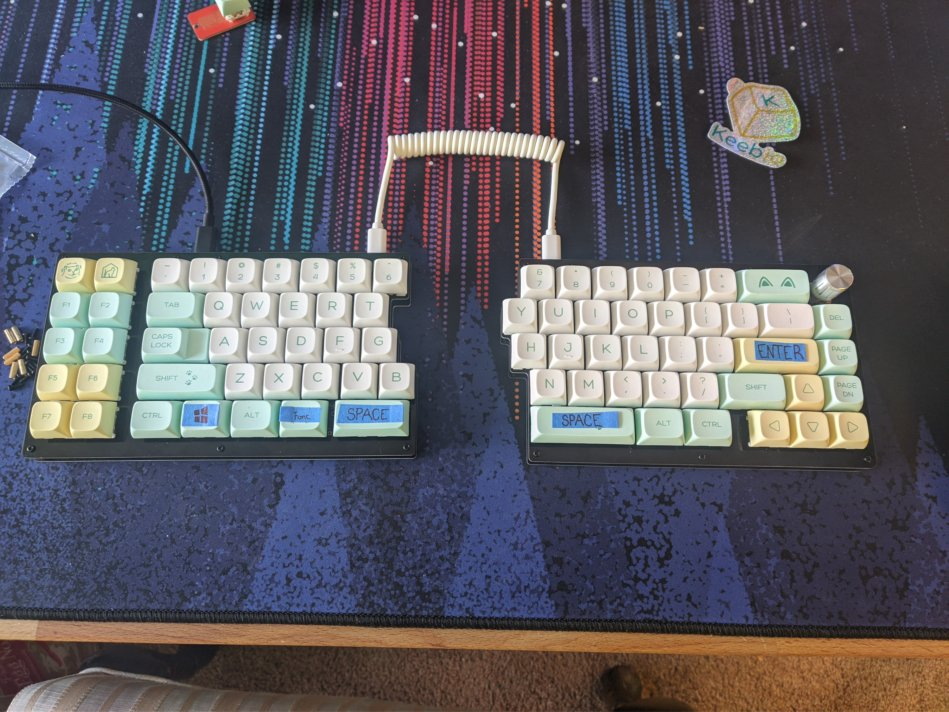
# Atreyu Compared to lily58
|
||||
|
||||
Same layout, different designs
|
||||

|
||||
|
||||
@ -5,46 +5,23 @@ icon: "/solidscribe.png"
|
||||
date: "2023-10-1"
|
||||
---
|
||||
|
||||
{.banner}
|
||||
Solid Scribe is an end-to-end encrypted note taking application I created for personal convenience and privacy.
|
||||
|
||||
[www.SolidScribe.com](https://www.solidscribe.com/) is a live application. You can sign up for free and use it right now.
|
||||
### Application overview
|
||||
|
||||
Solid Scribe is a zero-access encrypted note taking application. Created for convenience and privacy.
|
||||
Solid Scribe is an encrypted note taking application that respects users privacy.
|
||||
|
||||
### Why it was created
|
||||
|
||||
I created solid scribe because I was tired of all my data being scraped and put into a giant marketing profile. Daily notes contain a lot of private information, giving all that data to google or facebook made me uncomfortable. I encouraged my friends to use SolidScribe because all their private data was being read by big corporations.
|
||||
I created solid scribe because I was tired of all my data being scraped and put into a giant marketing profile. Daily notes contain a lot of private information, giving all that data to google or facebook made me uncomfortable.
|
||||
|
||||
One of my friends argued "I would rather have google read my notes than someone I know." This lead me to note encryption. Without a password, all notes are unreadable.
|
||||
### How it works
|
||||
|
||||
### How it works - Security
|
||||
|
||||
When a note is made, a database entry is created with note text and random noise. This noise is encrypted with the note text to increase entropy. No two notes are the same. When a user access this not, their encryption key decrypts the text and they can edit it. All encryption keys are stored on the server, encrypted with the users password. This is to prevent users from losing them or attempting to falsify their data for access to other users information.
|
||||
|
||||
### Zero Access Encryption
|
||||
|
||||
Note data is stored on the server encrypted. If someone leaked the database and took all the information, note data would not be readable. Without the users password for decryption, nothing can be read. All requests send a json web token with a session id and a session key. This session key is used to decrypt your session on the server. Yes, even the session data stored on the server is encrypted. These sessions tokens expire and are renewed every 100 requests. If a session token does not decrypt properly, all sessions for that user are revoked. Even if an attacker gained access to all the data on the server and your computer browser information, they would only have a small window for an attack.
|
||||
Solid Scribe is end to end encrypted with note text completely encrypted using a private key. Any time a note is created a new encrypted database entry is created. Note text can not be read without the correct decryption key.
|
||||
|
||||
### Tech Stack
|
||||
|
||||
- Solid Scribe is hosted on linode, using NGINX and Express router.
|
||||
- The backend is a fully custom Node.js server without an ORM and minimal frameworks to support maintainability and minimize attack vectors.
|
||||
- The frontend Vue.js using Vue-CLI, Socket.io and Sematic UI for the styles.
|
||||
|
||||
### Current Major Features
|
||||
|
||||
- User accounts/login - Two Factor Authentication
|
||||
- Revoking active sessions from other browsers
|
||||
- Color themes and Dark mode
|
||||
- Note tags, tag searching
|
||||
- Note Searching, using Encrypted search index
|
||||
- Encrypted Notes with text editing, formatting, color themes
|
||||
- Todo lists with sorting and removing completed tasks
|
||||
- Link scraping from notes, with image capture and search
|
||||
- Inserting of link metadata into note
|
||||
- Secure sharing of notes with other users using public-key encryption
|
||||
- Synchronous note editing across open note instances
|
||||
- Securley pushing URLs from browser to your account using a bookmarklet
|
||||
Solid Scribe is hosted on linode, using nginx and express router.
|
||||
|
||||
### Source Code
|
||||
|
||||
|
||||
@ -1,98 +0,0 @@
|
||||
---
|
||||
title: crDroid 9.1 OnePlus 7 pro install/update
|
||||
author: Max Gialanella
|
||||
tags:
|
||||
- android
|
||||
- crdroid
|
||||
categories: []
|
||||
date: 2023-01-14 17:54:07
|
||||
---
|
||||
|
||||
This will walk you through **installing a custom rom** on your phone, **updating the firmware** and **installing google apps**. Then **rooting your phone**.
|
||||
|
||||
This tutorial is intended for a **OnePlus 7 Pro**, executed on a Debian based Linux machine but the same steps can be applied to windows. I'm running Linux Mint.
|
||||
|
||||
Any custom android rom requires an unlocked bootloader. If your bootloader is not unlocked, find a tutorial on how to do that.
|
||||
If this is your first time installing the crDroid, you should factory reset your phone.
|
||||
|
||||
#### Install Android platform tools
|
||||
|
||||
Here is a good explanation on android debug bridge (ADB) and other tools -> https://wiki.lineageos.org/adb_fastboot_guide
|
||||
Here is a link for platform specific setups.
|
||||
https://www.xda-developers.com/install-adb-windows-macos-linux/#how-to-set-up-adb
|
||||
|
||||
On Linux you can just use a package manager to install the required tools:
|
||||
`sudo apt-get install android-tools-adb android-tools-fastboot`
|
||||
|
||||
#### Download all required packages
|
||||
|
||||
Navigate to -> https://crdroid.net/guacamole/9 and Download:
|
||||
|
||||
- **Latest ROM** click -> "Download latest version" button
|
||||
- **Latest Firmware** click -> "Firmware" button and download latest version
|
||||
- **Latest Gapps** click -> "Gapps" button -> Latest folder -> Download the Gapps version you need. If you are unsure, just grab "NikGapps-stock-..."
|
||||
- **Latest Recovery** -> Recovery -> Download Latest Version. If your recovery is not the crDroid recovery, download it now.
|
||||
|
||||
#### Testing your tools are set up correctly
|
||||
|
||||
Open a terminal window and type in `adb --version` make sure it prints out the version and the installed path. Do the same again with `fastboot --version`.
|
||||
|
||||
Its essential to have both fastboot and adb accessible and set up correctly or the firmware update script won't work correctly.
|
||||
|
||||
#### Connect to your phone via USB and enable USB debugging
|
||||
|
||||
- Grab your Phone. Make sure you enable USB Debugging in the developer menu.
|
||||
- On your machine run `sudo adb devices`
|
||||
- On your phone you should get a prompt, Allow USB Debugging? YES!
|
||||
- Your computer should list the connected devices. Now reboot your phone to the bootloader with the command
|
||||
- `adb reboot bootloader` your phone will restart to the bootloader.
|
||||
|
||||
#### Enter fastboot to install crDroid recovery
|
||||
|
||||
- Plug in your phone and use command `adb reboot fastboot` to boot into fastboot.
|
||||
- Flash the crDroid recovery boot.img with command `fastboot flash boot boot.img`
|
||||
- Now restart to recovery with command `fastboot reboot recovery`
|
||||
- Make sure crDroid recovery installed correctly.
|
||||
|
||||
#### Enter fastboot to apply firmware update
|
||||
|
||||
- Inside the bootloader, use the up/down volume buttons until the top says "Recovery Mode" press the lock button to select. The phone will boot into recovery mode.
|
||||
- Select "Advanced" -> "Enter Fastboot"
|
||||
- Your phone is now ready for the firmware update. On your computer, extract "OP7Pro firmware flash tool.zip" and enter the folder. You will see "Update-firmware.bat" and "Update-firwmare.sh"
|
||||
- On windows you can just double click "update-firmware.bat"
|
||||
- On Linux run the command `./Update-firmware.sh` then follow the prompts on screen. (Yes to everything)
|
||||
- Once the update is complete, on your phone press "Enter Recovery"
|
||||
|
||||
#### Enter recovery to sideload packages
|
||||
|
||||
- Inside the bootloader, use the up/down volume buttons until the top says "Recovery Mode" press the lock button to select. The phone will boot into recovery mode.
|
||||
- Select "Apply Update" -> "Apply from adb"
|
||||
- Your phone is now ready for packages from your computer.
|
||||
On your computer:
|
||||
- **Update Rom**: run the command `adb sideload <crdroid update.zip>`
|
||||
- Reboot to recovery again.
|
||||
- **Update Gapps**: run the command `adb sideload <selected gapps.zip>`
|
||||
- "Reboot system now"
|
||||
|
||||
#### Root your phone
|
||||
|
||||
- Make sure you booted into your phone and unlocked it. Make sure all updates are complete.
|
||||
- Browse to -> https://themagisk.com/ and download the magisk.apk
|
||||
- Install the magisk.apk on your phone.
|
||||
- Reboot back into recovery `adb reboot recovery` and select "Apply Update" -> "Apply from adb"
|
||||
- Browse to -> https://themagisk.com/ on your computer and download the SAME magisk.apk
|
||||
- Rename "Magisk.apk" to "Magisk.zip"
|
||||
- Now sideload the apk straight into your phone `adb sideload Magisk.zip`
|
||||
- "Reboot system now"
|
||||
- On your phone, download and install the magisk.apk
|
||||
- You can now do rooted things.
|
||||
|
||||
#### Unable to mount error
|
||||
|
||||
- If you see this error its because your data partition is encrypted. Do not worry about it. You can still access your phone with ADB.
|
||||
|
||||
#### Useful ADB Commands
|
||||
|
||||
- Print a list of connected devices: `adb devices`
|
||||
- Kill the ADB server: `adb kill-server`
|
||||
- Install a package: `adb install <path to apk or zip file>`
|
||||
@ -18,7 +18,7 @@ The logo of Ravenwulf was challenging to design. The request was to create a uni
|
||||
|
||||
Ravenwulf is powered by Nuxt.js with the front end built using TailwindCss. I have never used either of these technologies before but they are modern and well documented.
|
||||
|
||||
I chose to use nuxt.js because its of declarative routing, server side rendering, good SEO options and most importantly, it uses Vue.js. Im a big Vue fan. I don't own any Vue swag but its only a matter of time. The declarative routing, which builds pages and routes based on files in a directory also allows the client to create new content without the need for developer interaction.
|
||||
I chose to use nuxt.js because its of declarative routing, server side rendering, good SEO options and most importantly, it uses Vue.js. Im a big Vue fan. I dont own any Vue clothing but its only a matter of time.
|
||||
|
||||
Next, I chose TailwindCSS because of all the hype. Was it really all its cracked up to be? Why relearn 100's of CSS selectors all over again just to get some new shorthand options? After spending some time with it, the short answer is "Hell Yes! Its good!"
|
||||
|
||||
@ -28,18 +28,16 @@ That's all I needed for this project. Almost all the configurations are the defa
|
||||
|
||||
I didn't want to spend much money on hosting. I actually didn't want to spend any money. This is where Cloudflare Pages enters the picture. They offer free hosting, for lower traffic projects, on their super robust edge network.
|
||||
|
||||
Cloudflare offers automatic builds. To trigger them, simply push to a Git Repo. Within minutes I had Ravenwulf on github and connected to Cloudflare Pages. Just like that, the site was live.
|
||||
Cloudflare offers automatic builds. To trigger them, simply push to a Git Repo. Within minutes I had Ravenwulf in a git repo and connected to Cloudflare Pages. Just like that, the site was live.
|
||||
|
||||
Hooking up the "Contact Form" and Sending email from the Ravenwulf was the only part of this project that was truly a headache. Mostly because the feature is new and the documentation is a mess. After much struggling, the contact form was setup and working. [I detailed a setup guide here.](https://blog.maxg.cc/2023/10/01/Sending-Emails-with-Cloudflare-Workers/)
|
||||
Hooking up the "Contact Form" and Sending email from the ravenwulf was the only part of this project that was truly a headache. Mostly because the feature is new and the documentation is a mess. After much struggling, the contact form was setup and working. [I detailed a setup guide here.](https://blog.maxg.cc/2023/10/01/Sending-Emails-with-Cloudflare-Workers/)
|
||||
|
||||
### Final thoughts on the Ravenwulf
|
||||
### Thoughts on the Ravenwulf Tech Stack
|
||||
|
||||
The design of Ravenwulf is a little boring but that was the clients request. I did my best to take pages of text and make them a little more engaging. I hate websites that try way too hard and mix in a million different styles and images to try and make dry content more engaging. At the end of the day, its better to have a bigger, accessible chunk of text, instead of some fancy but hardly informational page. Not to mention, the work maintaining and building carousels, fly-in effects, parallax effects and all the supporting media, just turns into a chore.
|
||||
|
||||
I'm extremely happy with the tech that runs Ravenwulf. Its modern and maintainable.
|
||||
I'm extremely happy with the tech that runs Ravenwulf.com.
|
||||
|
||||
**TailwindCSS** is a fantastic tool. It made prototyping and building the site a breeze. Its major advantage is how explicit all the CSS declarations become. No more checking the style of .btn then .main then .content then checking the inspector to see how they are being rendered. Its all made clear from a glance at the element. While this does lend itself to more bulky, confusing and cluttered HTML syntax,the benefits completely outweigh the cons. Tailwind provides easy access to flexbox, responsive elements and color pallets. Additionally, almost never checking the inspector in the Browser make tailwind an absolute delight. Despite its added dependencies it will be my go-to on future projects.
|
||||
|
||||
**Nuxt.js** is a great framework. I barley scratched the surface of what its capable of doing because it does so much out of the box. I set up some pages, a couple components and thats it. It automatically generates routes. It automatically manages component includes. Its dev server is setup with file watching and hot-reloading. One click here, a click there and an entire site is built. There are tons of additional tools and options in Nuxt should anything else arise in the project, im sure nuxt could handle it. It also has a pretty large repository of Plugins.
|
||||
|
||||
**Inkscape** is a great tool but its SVG export options are frustrating to say the least. It has a large number of tools and options. While browsers only support a small subset of what Inkscape is capable of creating. The internet is riddled with support threads asking why gradients don't render, elements don't appear, layer masks don't work on export or why entire SVGs are empty after saving. If Inkscape had an "export to web" option, it would be a top quality piece of open source software. Without that, its tough to recommend. I guess you can use Adobe Illustrator but I ain't got the money for that.
|
||||
**Inkscape** is a great tool but its SVG export options are frustrating to say the least. It supports a large number of tools and options. While browsers only support a small subset of what Inkscape is capable of creating. The internet is riddled with support threads asking why gradients don't render, elements don't appear, layer masks don't work on export or why entire SVGs are empty after saving. If Inkscape had an "export to web" option, it would be a top quality piece of open source software. Without that, its tough to recommend. I guess you can use Adobe Illustrator but I ain't got the money for that.
|
||||
|
||||
@ -1,14 +0,0 @@
|
||||
---
|
||||
title: "Obligatory I am starting a blog, blog post"
|
||||
categories: []
|
||||
tags: []
|
||||
date: 2023-01-01 04:01:31
|
||||
---
|
||||
|
||||
As we fumble around life, doing little projects we end up learning little things and forgetting a lot of things.
|
||||
|
||||
My hope is that someone will google a strange problem and find the strange solution here. I wish to add to the global human corpus of knowledge in a small way.
|
||||
|
||||
I also hope to document things I will forget.
|
||||
|
||||
If you don't find anything you enjoy, why don't you go somewhere else? Its not like I'm monetizing this blog. Your patronage means nothing to me. Hope you have a great day.
|
||||
@ -1,34 +0,0 @@
|
||||
---
|
||||
title: PC Builds
|
||||
author: Max Gialanella
|
||||
tags: []
|
||||
categories: []
|
||||
date: 2023-02-22 19:33:30
|
||||
---
|
||||
|
||||
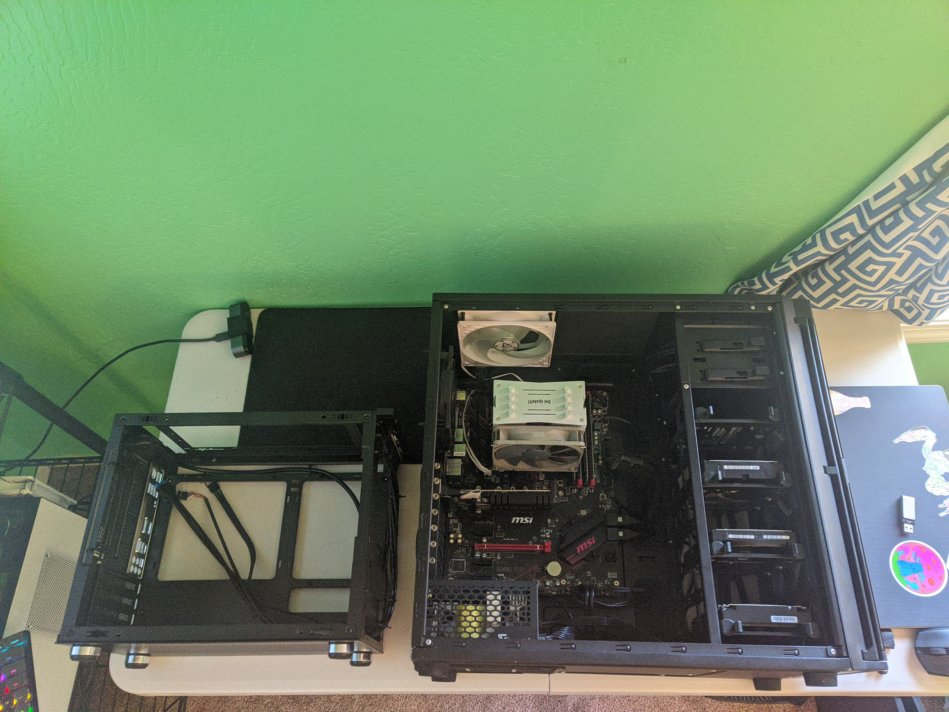
At some point I became infatuated with the [SAMA IM01 Case](https://www.newegg.com/p/N82E16811197012). At only 22 liters, it can house an ATX power supply and a large cooler. I bought two! Thus began the journey of rebuilding both my PC and my unRaid server into smaller cases.
|
||||
|
||||
#### Server Going into the SAMA
|
||||
|
||||
Had to purchase an ATX motherboard for complete this one.
|
||||
|
||||
|
||||
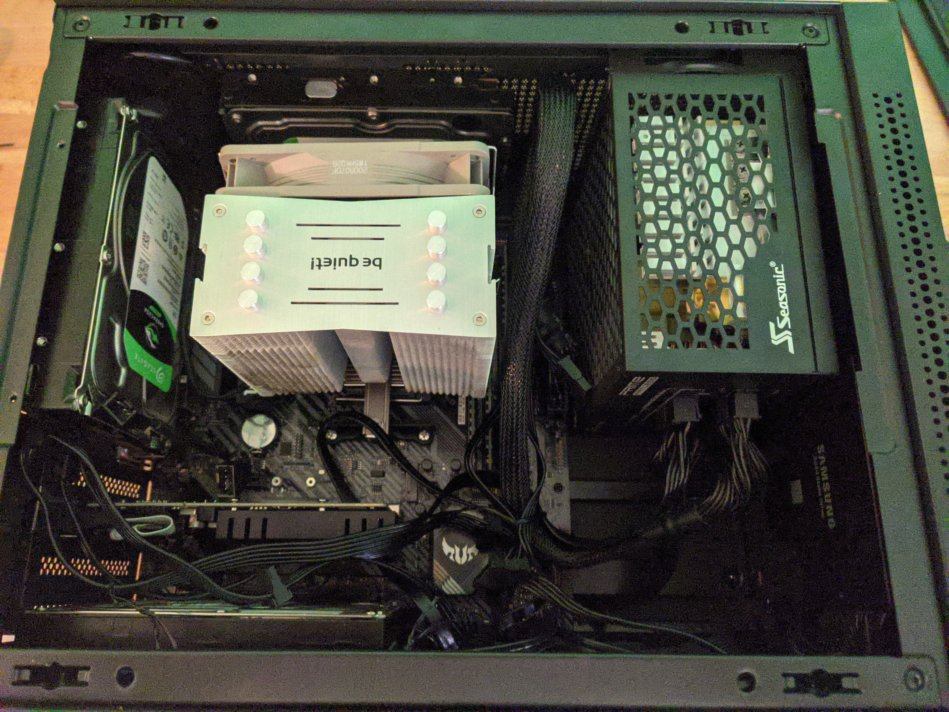
#### Server Complete
|
||||
|
||||
Cramming three hard drives and an SSD into this case, with an ATX power supply wasn't easy. I had to get creative with the mounting. Two are semi mounted on the bottom while the third is mounted into screw holes. There is an additional intake fan mounted below the PSU which was removed for this photo.
|
||||
|
||||
|
||||
#### PC going into SAMA
|
||||
|
||||
My PC was already pretty small, with an ATX board, so it wasn't much trouble to transplant it. I couldn't fit my favorite cooler, the NHD15 and had to switch to the Scythe Fuma.
|
||||
|
||||
|
||||
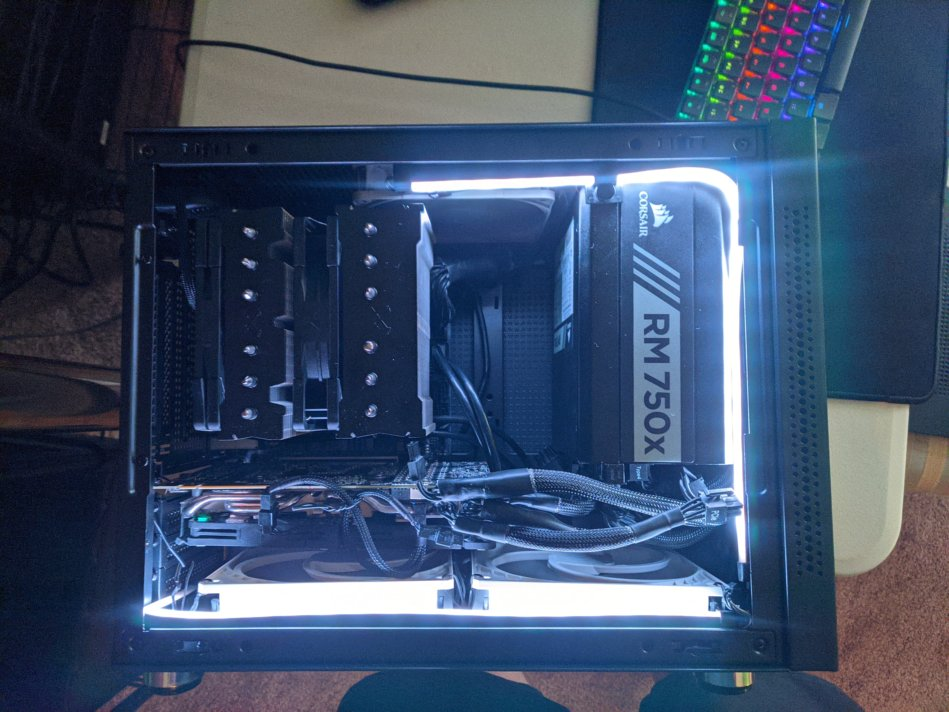
#### PC complete
|
||||
|
||||
All in all the build came out nice but I ended up being very frustrated with the noise and performance. I switched all the fans to the [Noctua Noctua NF-P12 redux](https://www.amazon.com/gp/product/B07CG2PGY6?psc=1) which are affordable and perform extremely well.
|
||||
|
||||
|
||||
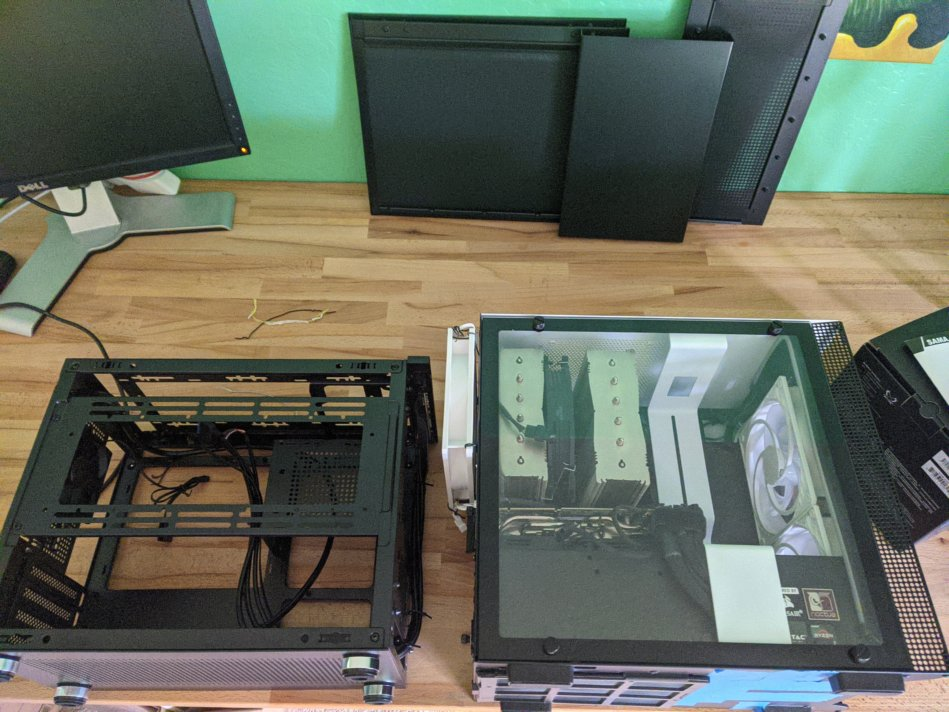
#### Final picture of both of them before cleaning everything up
|
||||
|
||||

|
||||
All in all I'm extremely satisfied with how these PCs came out. There isn't much advantage to stuffing everything into a smaller case. Its generally louder and hotter. The only thing you get is satisfaction.
|
||||
@ -1,24 +0,0 @@
|
||||
---
|
||||
title: "Why use ergonomic keyboards?"
|
||||
description: "Ergonomic keyboards have a number of benefits."
|
||||
date: "2023-10-1"
|
||||
---
|
||||
|
||||

|
||||
|
||||
Ergonomic keyboards are a class of keyboard that do something to conform to the shape of the human body.
|
||||
This class of keyboards exists because keyboards are not ergonomic. This seems like an obvious distinction but imagine if we had non-ergonomic shoes. Shoes that don't fit the shape of a human foot. Would anyone ever use a non-ergonomic shoe over an ergonomic one?
|
||||
|
||||
Imagine walking all day in a non-ergonomic shoe. How uncomfortable. Yet, For some reason we accept that using an uncomfortable keyboard for 8 or more hours a day is fine.
|
||||
|
||||
### Not for human fingers
|
||||
|
||||
Keyboards rows are staggered, while human fingers do up and down.
|
||||
|
||||
### Not for human wrists
|
||||
|
||||
Keyboards are flat which force wrists to pronate, over time this causes wrist issues.
|
||||
|
||||
### Not for human posture
|
||||
|
||||
Keyboards force our hands to be next to one another to type quickly. This closes our posture and forces are arms into weird angles.
|
||||
@ -1,11 +0,0 @@
|
||||
module.exports = {
|
||||
apps: [
|
||||
{
|
||||
name: 'Max Resume',
|
||||
port: '3004',
|
||||
exec_mode: 'cluster',
|
||||
instances: 'max',
|
||||
script: './.output/server/index.mjs'
|
||||
}
|
||||
]
|
||||
}
|
||||
@ -1,12 +1,10 @@
|
||||
<template>
|
||||
<div class="flex flex-col min-h-screen bg-slate-100 main-body">
|
||||
<div class="flex flex-col min-h-screen bg-slate-100">
|
||||
<slot />
|
||||
|
||||
<footer
|
||||
class="mx-auto w-full text-white bg-zinc-900 p-2 no-print"
|
||||
></footer>
|
||||
<footer class="mx-auto w-full text-white bg-zinc-900 p-2"></footer>
|
||||
<div
|
||||
class="w-full mx-auto bg-zinc-800 flex flex-col justify-center items-center py-9 text-white no-print"
|
||||
class="w-full mx-auto bg-zinc-800 flex flex-col justify-center items-center py-9 text-white fade-in-children"
|
||||
>
|
||||
<span> Max Gialanella - {{ new Date().getFullYear() }} </span>
|
||||
</div>
|
||||
|
||||
@ -1,19 +0,0 @@
|
||||
<template>
|
||||
<div class="flex w-3xl mx-auto">
|
||||
<slot />
|
||||
</div>
|
||||
</template>
|
||||
|
||||
<style>
|
||||
html,
|
||||
body {
|
||||
background-image: url("data:image/svg+xml,%3Csvg xmlns='http://www.w3.org/2000/svg' width='28' height='49' viewBox='0 0 28 49'%3E%3Cg fill-rule='evenodd'%3E%3Cg id='hexagons' fill='%239C92AC' fill-opacity='0.25' fill-rule='nonzero'%3E%3Cpath d='M13.99 9.25l13 7.5v15l-13 7.5L1 31.75v-15l12.99-7.5zM3 17.9v12.7l10.99 6.34 11-6.35V17.9l-11-6.34L3 17.9zM0 15l12.98-7.5V0h-2v6.35L0 12.69v2.3zm0 18.5L12.98 41v8h-2v-6.85L0 35.81v-2.3zM15 0v7.5L27.99 15H28v-2.31h-.01L17 6.35V0h-2zm0 49v-8l12.99-7.5H28v2.31h-.01L17 42.15V49h-2z'/%3E%3C/g%3E%3C/g%3E%3C/svg%3E"),
|
||||
linear-gradient(135deg, rgba(0, 0, 0, 0) 1%, rgba(0, 8, 70, 0.56) 60%),
|
||||
radial-gradient(
|
||||
circle at left bottom,
|
||||
rgb(179, 0, 193) 0%,
|
||||
rgb(0, 0, 0) 50%
|
||||
);
|
||||
@apply w-full h-full;
|
||||
}
|
||||
</style>
|
||||
@ -4,8 +4,5 @@ export default defineNuxtConfig({
|
||||
devtools: { enabled: false },
|
||||
content: {
|
||||
documentDriven: true
|
||||
},
|
||||
app: {
|
||||
pageTransition: { name: 'page', mode: 'out-in' }
|
||||
},
|
||||
}
|
||||
})
|
||||
@ -1,9 +1,9 @@
|
||||
{
|
||||
"name": "nuxt-app",
|
||||
"private": true,
|
||||
"type": "commonjs",
|
||||
"type": "module",
|
||||
"scripts": {
|
||||
"build": "nuxt build && pm2 kill && pm2 start ecosystem.config.js",
|
||||
"build": "nuxt build",
|
||||
"dev": "nuxt dev",
|
||||
"generate": "nuxt generate",
|
||||
"preview": "nuxt preview",
|
||||
|
||||
1046
pages/backup.vue
@ -13,10 +13,7 @@
|
||||
<div class="pt-4"></div>
|
||||
<div class="mx-auto max-w-3xl px-4 blog">
|
||||
<h1>{{ page.title }}</h1>
|
||||
<p class="text-zinc-500 pb-2">
|
||||
{{ page.description }}
|
||||
<span class="float-right">{{ page.date }}</span>
|
||||
</p>
|
||||
<h2 class="text-zinc-500 pb-3">Posted on: {{ page.date }}</h2>
|
||||
<!-- <ContentDoc /> -->
|
||||
<ContentRenderer :key="page._id" :value="page" />
|
||||
</div>
|
||||
@ -33,26 +30,20 @@
|
||||
<!-- <p>{{ post }}</p> -->
|
||||
</a>
|
||||
</div>
|
||||
<div class="hidden">
|
||||
<img src="" alt="" class="banner" />
|
||||
</div>
|
||||
</div>
|
||||
</template>
|
||||
|
||||
<script setup>
|
||||
// Find current page content
|
||||
const { page } = useContent();
|
||||
|
||||
// Find other pages and list them
|
||||
const { data } = await useAsyncData("blog", () => queryContent("/").find());
|
||||
|
||||
onMounted(() => {
|
||||
document.title = "Projects | Max Gialanella";
|
||||
});
|
||||
// Find current page content
|
||||
const { page } = useContent();
|
||||
// console.log(page.value);
|
||||
// console.log(data.value);
|
||||
</script>
|
||||
|
||||
<style>
|
||||
r .blog {
|
||||
.blog {
|
||||
@apply leading-9 text-base;
|
||||
}
|
||||
.blog a {
|
||||
@ -65,23 +56,9 @@ r .blog {
|
||||
@apply pt-5 mb-2 text-xl border-b border-zinc-300;
|
||||
}
|
||||
.blog img {
|
||||
@apply my-3 shadow-md;
|
||||
@apply my-3 shadow-sm;
|
||||
}
|
||||
.blog p + P {
|
||||
@apply pt-4;
|
||||
}
|
||||
.blog ul {
|
||||
@apply list-disc ml-10;
|
||||
}
|
||||
.blog .banner {
|
||||
background-color: #ebebeb;
|
||||
width: 100%;
|
||||
padding: 15px 0;
|
||||
max-height: 150px;
|
||||
}
|
||||
.blog .banner2 {
|
||||
text-align: center;
|
||||
max-height: 150px;
|
||||
width: auto;
|
||||
}
|
||||
</style>
|
||||
|
||||
@ -1,622 +0,0 @@
|
||||
<template>
|
||||
<div class="flex justify-center items-center w-2xl mx-auto">
|
||||
<div class="flex flex-row flex-wrap items-start w-full">
|
||||
<div class="text-box py-2 w-full">
|
||||
<input
|
||||
type="text"
|
||||
placeholder="Type some shit 😘🔎"
|
||||
class="glass"
|
||||
v-model="inputText"
|
||||
v-on:keydown="filterKeydown"
|
||||
v-on:keyup="filterLinks"
|
||||
v-on:keyup.enter="webSearch"
|
||||
ref="search"
|
||||
/>
|
||||
</div>
|
||||
|
||||
<div v-for="column in columns" class="w-1/2 md:w-1/4 flex flex-col">
|
||||
<h2 class="capitalize text-center text-white">{{ column }}</h2>
|
||||
<div
|
||||
v-for="link in sortedLinks(links, column)"
|
||||
class="p-1 flex flex-col justify-stretch"
|
||||
>
|
||||
<a
|
||||
:href="setupUrl(link.url)"
|
||||
class="rounded-md bg-slate-200 py-2 md:px-4 glass text-s text-center md:text-left md:text-base"
|
||||
target="_self"
|
||||
v-if="link.column == column"
|
||||
>
|
||||
<span class="visual-aid">
|
||||
{{ link.emoji }}
|
||||
</span>
|
||||
{{ link?.title }}
|
||||
</a>
|
||||
</div>
|
||||
</div>
|
||||
<!-- <div class="lip one"></div> -->
|
||||
|
||||
<span
|
||||
v-on:click="clicks++"
|
||||
class="small message"
|
||||
v-html="generateMessage(2)"
|
||||
></span>
|
||||
</div>
|
||||
</div>
|
||||
</template>
|
||||
|
||||
<script setup>
|
||||
definePageMeta({
|
||||
layout: "homepage",
|
||||
});
|
||||
let seed = ref(0);
|
||||
let clicks = ref(0);
|
||||
let inputText = ref("");
|
||||
let suggestions = ref([]);
|
||||
let suggestionIndex = ref(0);
|
||||
let autocomplete = ref(["google.com", "gmail.com", "graxday.com"]);
|
||||
let columns = ref(["web", "apps", "local", "dumb"]);
|
||||
let links = ref([
|
||||
{
|
||||
column: "local",
|
||||
url: "192.168.1.6",
|
||||
title: "Tower",
|
||||
emoji: "🖥️",
|
||||
},
|
||||
{
|
||||
column: "local",
|
||||
url: "192.168.1.242/admin",
|
||||
title: "Pi-Hole",
|
||||
emoji: "🌌",
|
||||
},
|
||||
{
|
||||
column: "local",
|
||||
url: "192.168.1.6:8112",
|
||||
title: "Deluge",
|
||||
emoji: "💦",
|
||||
},
|
||||
{
|
||||
column: "local",
|
||||
url: "192.168.1.164",
|
||||
title: "Marvin",
|
||||
emoji: "🧪",
|
||||
},
|
||||
{
|
||||
column: "local",
|
||||
url: "https://192.168.1.1",
|
||||
title: "Router",
|
||||
emoji: "📶",
|
||||
},
|
||||
|
||||
{
|
||||
column: "apps",
|
||||
url: "192.168.1.164:9999/admin",
|
||||
title: "Blog Editing",
|
||||
emoji: "✏️",
|
||||
},
|
||||
|
||||
{
|
||||
column: "apps",
|
||||
url: "www.solidscribe.com",
|
||||
title: "Solid Scribe",
|
||||
emoji: "🔏",
|
||||
},
|
||||
{
|
||||
column: "web",
|
||||
url: "www.wunderground.com/weather/us/az/flagstaff/KAZFLAGS335",
|
||||
title: "Weather",
|
||||
emoji: "🌦️",
|
||||
},
|
||||
|
||||
{
|
||||
column: "web",
|
||||
url: "www.amazon.com",
|
||||
title: "Amazon",
|
||||
emoji: "🛒",
|
||||
},
|
||||
{
|
||||
column: "web",
|
||||
url: "www.camelcamelcamel.com",
|
||||
title: "Camel Camel Camel",
|
||||
emoji: "🐫",
|
||||
},
|
||||
|
||||
{
|
||||
column: "apps",
|
||||
url: "spotify.com",
|
||||
title: "Spotify",
|
||||
emoji: "🎶",
|
||||
},
|
||||
{
|
||||
column: "web",
|
||||
url: "butcherbox.com",
|
||||
title: "Butcher Box",
|
||||
emoji: "📦",
|
||||
},
|
||||
{
|
||||
column: "apps",
|
||||
url: "schwab.com",
|
||||
title: "Schwab",
|
||||
emoji: "🤑",
|
||||
},
|
||||
{
|
||||
column: "local",
|
||||
url: "graxday.com",
|
||||
title: "Grax Day",
|
||||
emoji: "😘",
|
||||
},
|
||||
{
|
||||
column: "web",
|
||||
url: "https://drive.google.com/drive/u/0/folders/10hsNBu0o8at687PLc5mcfDtJkhjDcwk9?ths=true",
|
||||
title: "Grax Day Docs",
|
||||
emoji: "📄",
|
||||
},
|
||||
|
||||
// {'column':'apps','url':'x.maxg.cc/code/?folder=/home/mab/ss', 'title':'Code Server', 'emoji':'🦿'},
|
||||
{
|
||||
column: "apps",
|
||||
url: "pix.maxg.cc/library/import",
|
||||
title: "PhotoPrism Import",
|
||||
emoji: "📷",
|
||||
},
|
||||
{
|
||||
column: "apps",
|
||||
url: "http://192.168.1.6:2342/library/login",
|
||||
title: "PhotoPrism Local",
|
||||
emoji: "📷",
|
||||
},
|
||||
|
||||
{
|
||||
column: "apps",
|
||||
url: "http://git.maxg.cc",
|
||||
title: "Gitea",
|
||||
emoji: "🍵",
|
||||
},
|
||||
{
|
||||
column: "web",
|
||||
url: "https://forum.xda-developers.com/t/rom-13-op7pro-crdroid-v9-0-18-12-2022.4511589/page-12",
|
||||
title: "OnePlus7 ISO",
|
||||
emoji: "📱",
|
||||
},
|
||||
{
|
||||
column: "local",
|
||||
url: "https://localhost:47990/",
|
||||
title: "Sunshine",
|
||||
emoji: "☀️",
|
||||
},
|
||||
|
||||
// dumb
|
||||
// {
|
||||
// column: "dumb",
|
||||
// url: "www.youtube.com",
|
||||
// title: "Youtube",
|
||||
// emoji: "📺",
|
||||
// },
|
||||
{
|
||||
column: "dumb",
|
||||
url: "arstechnica.com",
|
||||
title: "ArsTechnica",
|
||||
emoji: "📰",
|
||||
},
|
||||
{
|
||||
column: "dumb",
|
||||
url: "phoronix.com",
|
||||
title: "Phoronix",
|
||||
emoji: "📰",
|
||||
},
|
||||
|
||||
{
|
||||
column: "dumb",
|
||||
url: "slashdot.org/",
|
||||
title: "Slashdot",
|
||||
emoji: "📃",
|
||||
},
|
||||
{
|
||||
column: "dumb",
|
||||
url: "imgur.com",
|
||||
title: "Imgur",
|
||||
emoji: "😺",
|
||||
},
|
||||
{
|
||||
column: "dumb",
|
||||
url: "hackaday.com",
|
||||
title: "Hack a Day",
|
||||
emoji: "☠",
|
||||
},
|
||||
// {
|
||||
// column: "dumb",
|
||||
// url: "duckduckgo.com",
|
||||
// title: "Duck Duck Go",
|
||||
// emoji: "🦆",
|
||||
// },
|
||||
// { column: "dumb", url: "bing.com", title: "Bing", emoji: "🦑" },
|
||||
{
|
||||
column: "web",
|
||||
url: "google.com",
|
||||
title: "Google",
|
||||
emoji: "🐚",
|
||||
},
|
||||
{
|
||||
column: "web",
|
||||
url: "https://www.etsy.com/shop/PowerfulSpell",
|
||||
title: "Powerful Spell",
|
||||
emoji: "🧚🏻",
|
||||
},
|
||||
{
|
||||
column: "dumb",
|
||||
url: "https://kbd.news/",
|
||||
title: "KBD",
|
||||
emoji: "⌨️",
|
||||
},
|
||||
{
|
||||
column: "dumb",
|
||||
url: "https://news.ycombinator.com/",
|
||||
title: "Hacker News",
|
||||
emoji: "💀",
|
||||
},
|
||||
{
|
||||
column: "dumb",
|
||||
url: "https://tildes.net/",
|
||||
title: "Tildes",
|
||||
emoji: "~",
|
||||
},
|
||||
|
||||
{
|
||||
column: "apps",
|
||||
url: "https://maxg.cc",
|
||||
title: "Maxg.cc - resume",
|
||||
emoji: "M",
|
||||
},
|
||||
{
|
||||
column: "local",
|
||||
url: "http://192.168.1.164:3002/",
|
||||
title: "Maxg.cc - Dev",
|
||||
emoji: "M",
|
||||
},
|
||||
|
||||
{ url: "", title: "" },
|
||||
{ url: "", title: "" },
|
||||
{ url: "", title: "" },
|
||||
{ url: "", title: "" },
|
||||
{ url: "", title: "" },
|
||||
{ url: "", title: "" },
|
||||
{ url: "", title: "" },
|
||||
{ url: "", title: "" },
|
||||
{ url: "", title: "" },
|
||||
{ url: "", title: "" },
|
||||
{ url: "", title: "" },
|
||||
{ url: "", title: "" },
|
||||
{ url: "", title: "" },
|
||||
{ url: "", title: "" },
|
||||
{ url: "", title: "" },
|
||||
{ url: "", title: "" },
|
||||
{ url: "", title: "" },
|
||||
]);
|
||||
|
||||
onMounted(() => {
|
||||
// setup autocomplete
|
||||
Object.keys(links).forEach((key) => {
|
||||
const link = links[key].url;
|
||||
if (link) {
|
||||
autocomplete.push(link);
|
||||
}
|
||||
});
|
||||
// remove duplicates
|
||||
// autocomplete = [...new Set(autocomplete)]
|
||||
|
||||
// $nextTick(() => {
|
||||
// $refs.search.focus();
|
||||
// });
|
||||
|
||||
document.title = "Home Page";
|
||||
});
|
||||
|
||||
function sortedLinks(inLinks, category) {
|
||||
let sortList = [];
|
||||
inLinks.forEach((link) => {
|
||||
const lowText = String(inputText.value).toLowerCase();
|
||||
const searchTitle = link.title.toLowerCase().includes(lowText);
|
||||
const searchUrl = link.url.toLowerCase().includes(lowText);
|
||||
const searchFilter = inputText == "" || searchTitle || searchUrl;
|
||||
|
||||
if (link.column == category && searchFilter) {
|
||||
sortList.push(link);
|
||||
}
|
||||
});
|
||||
|
||||
console.log(sortList);
|
||||
return sortList.sort((a, b) => {
|
||||
return a.title.localeCompare(b.title);
|
||||
});
|
||||
}
|
||||
function setupIcon(title) {
|
||||
title = title.toLowerCase().trim();
|
||||
|
||||
return icons[finalRandomIndex];
|
||||
}
|
||||
function setupUrl(inUrl) {
|
||||
if (inUrl.indexOf("http") === -1) {
|
||||
inUrl = "http://" + inUrl;
|
||||
}
|
||||
|
||||
return inUrl.trim();
|
||||
}
|
||||
function filterKeydown(e) {
|
||||
if (e.code != "Tab") {
|
||||
return;
|
||||
}
|
||||
if (e.code == "Tab") {
|
||||
e.preventDefault();
|
||||
suggestionIndex++;
|
||||
if (suggestionIndex > suggestions.length - 1) {
|
||||
suggestionIndex = 0;
|
||||
}
|
||||
}
|
||||
return;
|
||||
}
|
||||
function filterLinks(e) {
|
||||
// if(e.code == 'Escape'){
|
||||
// e.preventDefault()
|
||||
// suggestions = []
|
||||
// inputText = ''
|
||||
// return
|
||||
// }
|
||||
// if(e.code == 'ArrowUp'){
|
||||
// e.preventDefault()
|
||||
// suggestionIndex--
|
||||
// if(suggestionIndex <= -1){
|
||||
// suggestionIndex = suggestions.length -1
|
||||
// }
|
||||
// return
|
||||
// }
|
||||
// if(e.code == 'ArrowDown'){
|
||||
// e.preventDefault()
|
||||
// suggestionIndex++
|
||||
// if(suggestionIndex > suggestions.length-1){
|
||||
// suggestionIndex = 0
|
||||
// }
|
||||
// return
|
||||
// }
|
||||
if (e.code == "Tab" || e.code == "Enter") {
|
||||
e.preventDefault();
|
||||
return;
|
||||
}
|
||||
|
||||
suggestionIndex = -1;
|
||||
suggestions = [];
|
||||
|
||||
const searchString = String(e.target.value)
|
||||
.trim()
|
||||
.toLowerCase()
|
||||
.replace("www.", "");
|
||||
|
||||
if (searchString.length < 2) {
|
||||
return;
|
||||
}
|
||||
|
||||
autocomplete.forEach((entry) => {
|
||||
const test = entry.toLowerCase().indexOf(searchString);
|
||||
if (test >= 0) {
|
||||
suggestions.push(entry);
|
||||
}
|
||||
});
|
||||
|
||||
suggestions = suggestions.splice(0, 2);
|
||||
}
|
||||
function webSearch(e) {
|
||||
// go to suggestion
|
||||
if (suggestions.length >= 1) {
|
||||
window.location.href = `https://${suggestions[0]}`;
|
||||
return;
|
||||
}
|
||||
|
||||
// go straight to URLs
|
||||
const urlCheck = String(e.target.value).trim();
|
||||
if (urlCheck.indexOf(".") > -1 && urlCheck.indexOf(" ") == -1) {
|
||||
let goodUrl = urlCheck.replace("http://", "").replace("www.", "");
|
||||
window.location.href = `https://www.${goodUrl}`;
|
||||
return;
|
||||
}
|
||||
|
||||
// Skip empty strings
|
||||
if (e.target.value == "") {
|
||||
return;
|
||||
}
|
||||
|
||||
// duck duck go search
|
||||
let webString = String(e.target.value).replaceAll(" ", "+");
|
||||
window.location.href = `https://duckduckgo.com/?hps=1&q=${webString}`;
|
||||
return;
|
||||
}
|
||||
function generateMessage(index) {
|
||||
let message = "";
|
||||
let m = [];
|
||||
|
||||
var now = new Date();
|
||||
var days = [
|
||||
"Sunday",
|
||||
"Monday",
|
||||
"Tuesday",
|
||||
"Wednesday",
|
||||
"Thursday",
|
||||
"Friday",
|
||||
"Saturday",
|
||||
];
|
||||
var months = [
|
||||
"January",
|
||||
"February",
|
||||
"March",
|
||||
"April",
|
||||
"May",
|
||||
"June",
|
||||
"July",
|
||||
"August",
|
||||
"September",
|
||||
"October",
|
||||
"November",
|
||||
"December",
|
||||
];
|
||||
|
||||
var day = days[now.getDay()];
|
||||
var month = months[now.getMonth()];
|
||||
|
||||
seed =
|
||||
parseInt(`${now.getMonth()}${now.getHours()}${now.getDay()}`) + clicks;
|
||||
|
||||
let weekday = day + ", " + month + " " + now.getDate() + "<sup>th</sup>";
|
||||
|
||||
if (index == 1) {
|
||||
m = [
|
||||
[
|
||||
"Continue",
|
||||
"Keep on",
|
||||
"Don't stop",
|
||||
"Persist",
|
||||
"Never stop",
|
||||
"Without falter keep",
|
||||
],
|
||||
[
|
||||
"Slaying",
|
||||
"Rocking",
|
||||
"Fighting",
|
||||
"murdering",
|
||||
"betraying",
|
||||
"stabbing",
|
||||
"killing",
|
||||
"dancing",
|
||||
],
|
||||
[weekday],
|
||||
];
|
||||
}
|
||||
if (index == 2 && seed % 2 == 0) {
|
||||
m = [
|
||||
["You", "The world", "The universe", "Your life"],
|
||||
[
|
||||
"really",
|
||||
"could be",
|
||||
"might be",
|
||||
"certainly",
|
||||
"will turn out to be",
|
||||
"will be",
|
||||
],
|
||||
[
|
||||
"tough",
|
||||
"strong",
|
||||
"a champ",
|
||||
"a bitch",
|
||||
"stronger than a bull",
|
||||
"another day",
|
||||
"a fine one",
|
||||
"sick nasty",
|
||||
],
|
||||
["."],
|
||||
["\nAll your"],
|
||||
[
|
||||
"exploits",
|
||||
"missions",
|
||||
"endeavors",
|
||||
"journeys",
|
||||
"limbs",
|
||||
"friendships",
|
||||
"meetings",
|
||||
"destinations",
|
||||
"plants",
|
||||
"thoughts",
|
||||
"dreams",
|
||||
"projects",
|
||||
],
|
||||
[
|
||||
"will",
|
||||
"could",
|
||||
"may",
|
||||
"certainly will",
|
||||
"are going to",
|
||||
"are about to",
|
||||
"will",
|
||||
"will",
|
||||
],
|
||||
[
|
||||
"succeed",
|
||||
"avail",
|
||||
"pass",
|
||||
"make good",
|
||||
"grow famous",
|
||||
"work",
|
||||
"profit",
|
||||
"reap success",
|
||||
"conquer",
|
||||
"avail",
|
||||
"thrive",
|
||||
"flourish",
|
||||
"triumph",
|
||||
],
|
||||
["."],
|
||||
];
|
||||
}
|
||||
if (index == 2 && seed % 2 == 1) {
|
||||
m = [
|
||||
["Things", "Stuff", "Its", "Everything"],
|
||||
["are not", "ain't", "is not"],
|
||||
["so", "that"],
|
||||
["bad", "grim", "brutal", "hard", "stuffy", "saddening"],
|
||||
[".", ".", ".", ".", ".", ".", ".", "?"],
|
||||
["\nGet", "\nRun", "\nSprint", "\nShamble"],
|
||||
["out there", "in there", "on over", "along now", "on over"],
|
||||
["and"],
|
||||
["seize", "grab", "embrace", "hug", "curb stomp", "smash"],
|
||||
["the", "those", "thine"],
|
||||
["tasty", "special", "spicy", "magical", "wicked", "powerful"],
|
||||
[
|
||||
"day",
|
||||
"goals",
|
||||
"missions",
|
||||
"pants",
|
||||
"trees",
|
||||
"dreams",
|
||||
"pants",
|
||||
"goats",
|
||||
"grundus",
|
||||
],
|
||||
["."],
|
||||
];
|
||||
}
|
||||
|
||||
m.forEach((part) => {
|
||||
// const p = part[Math.floor(Math.random() * part.length)]
|
||||
const p = part[seed % part.length];
|
||||
let space = " ";
|
||||
if (p == "." || p == "?") {
|
||||
space = "";
|
||||
}
|
||||
message += space + p;
|
||||
});
|
||||
|
||||
return "<span>" + message + "</span>";
|
||||
}
|
||||
</script>
|
||||
|
||||
<style scoped>
|
||||
a.glass {
|
||||
transition: all 0.4s ease-out;
|
||||
}
|
||||
a.glass:hover {
|
||||
transition: all 0.4s ease-out;
|
||||
/* background-color: #35004d;*/
|
||||
backdrop-filter: blur(7px);
|
||||
}
|
||||
.glass {
|
||||
background-color: rgba(255, 255, 255, 0.25);
|
||||
backdrop-filter: blur(3px);
|
||||
border: 2px solid rgba(255, 255, 255, 0.1);
|
||||
color: white;
|
||||
}
|
||||
input {
|
||||
width: calc(100% - 20px);
|
||||
margin: 0 10px 15px;
|
||||
font-size: 1.4em;
|
||||
border-radius: 4px;
|
||||
outline: none;
|
||||
padding: 10px 15px;
|
||||
border: none;
|
||||
box-sizing: border-box;
|
||||
}
|
||||
</style>
|
||||
732
pages/index.vue
|
Before Width: | Height: | Size: 199 KiB |
|
Before Width: | Height: | Size: 270 KiB |
|
Before Width: | Height: | Size: 382 KiB |
|
Before Width: | Height: | Size: 278 KiB |
|
Before Width: | Height: | Size: 207 KiB |
|
Before Width: | Height: | Size: 382 KiB |
|
Before Width: | Height: | Size: 175 KiB |
|
Before Width: | Height: | Size: 108 KiB |
|
Before Width: | Height: | Size: 657 KiB |
|
Before Width: | Height: | Size: 16 KiB |